Wait a minute, I thought this was an “Exchange blog”, why is your first article about networking with pfSense?!
Well, in order to create high quality Exchange related content for this site, I’ve been building a lab. There has been some interest in how I’ve setup my lab, so I thought I’d show you. What better way to help people learn Exchange than by showing them how to create a powerful lab environment to run it in? Besides, having a good understanding of boundary systems is very useful when troubleshooting mail flow issues.
Part 1 of my “Budget Laboratory” series is actually optional, and the only part of the lab that will cost anything (assuming you already own the hardware). It will only cost anything if you plan on using your Lab for more than 30 days.
We’ll be building most of this lab using only a single computer. I recommend a quad core CPU with at least 8 GB of RAM, however you may be able to do it with less.
The information in this guide will be useful for much more than a home lab, you could also use this in a production environment for a small business, or even a large enterprise, if scaled and configured properly.
- You will need:
- A computer with 3 RJ45 (network) ports and a 64bit Operating System (OS).*
- At least two high speed internet connections.**
- VMWare Workstation 7. (30 day FREE trial, $100 after that.)
- pfSense 1.2.3 virtual appliance. (FREE!)***
- A Wireless Access Point, switch, or combined device.****
*If you don’t have 3 RJ45 ports available, I highly recommend adding Intel Pro 1000 NICs. You can use your on-board NIC for one of the connections. For my setup, I purchased 2 Intel Pro 1000 NICs for $30 each, and used the on-board RealTEK NIC off my motherboard for the 3rd. Why a 64bit OS? Because later on in this series I will show you how to run VMWare ESXi 4.1 inside of VMWare Workstation, and connect it to a virtual SAN. The host OS has to be 64bit for this to work. I’ll be using 64-bit Windows 7 for my examples. You can achieve the same results with your favorite 64bit Linux distribution as a host operating system.
**If you don’t have 2 high speed internet connections, you obviously won’t be able to setup Multi-WAN load balancing. However you can still setup a pfSense firewall inside of VMWare Workstation 7, and route all of your network traffic.
***I’ll be doing another guide for pfSense 2.0 when the final stable build is released for it.
****I’m using a LinkSys WRT330N, which is a combination Wireless Access Point, Router, and 4 port gigabit switch.
Step 1: Connect the modems and switch to your computer.

Each connection to your ISP should go to 1 port on the computer you’ll be setting pfSense up on. One connection goes to the switch for your LAN.
Note: If you are using something similar to the Linksys WRT330N that I have, you want to use one of the LAN switch ports on it for the connection to the pfSense firewall. DO NOT use the “INTERNET” (WAN/uplink) port, it won’t work. You also need to turn off the firewall, NAT, and DHCP server on this device, if it has those features. We’ll be using pfSense to do all of that now. You will need to change the default IP on this device as well. Usually it’s something like 192.168.1.1. We’ll be using x.x.x.1 as the gateway IP for our LAN. These devices usually aren’t smart enough to do VLANs, so if the address space doesn’t match what we configure in pfSense, things aren’t going to work. I changed mine to x.x.x.5. You can use any private address space you like for your LAN. Since mine is a small home lab, I’m using a single 24 bit subnet, so this guide will reflect that.
Step 2: Configure the host.
As I mentioned, I’m using 64bit Windows 7 as my host, so this example is from that. If you’re using a different host OS, you will need to do accomplish the same end result.
First, I recommend labeling your NICs. I gave mine names that matched what they are connected to. If I had 2 different ISPs, I would have given the WAN links the name of the ISP they are connected to, but since I don’t, I named them after the modem model number they are connected to instead.


The last thing we need to do in this step, is change the binding order of the NICs. In Windows 7 you hit “Alt+N” to bring up the hidden menu in your Network Connections, then select “Advanced Settings”. Move your LAN NIC to the top of the list.

This is done to make sure traffic from the host OS gets routed through the pfSense firewall. If you do not do this, both the host OS, and the pfSense VM will try to pick up an IP address from your ISP(s). Your host will end up connecting to the internet through one of these NICs and not be able to take advantage of the load balancing.
You need to leave TCP/IP enabled on your LAN NIC.
Step 3: Configure VMWare Workstation 7
If you haven’t already installed VMWare Workstation 7, do it now before continuing.
Here we need to configure the NICs for use by our virtual machines. Click “Edit” then “Virtual Network Editor”.

Step 4: Configure the pfSense virtual machine settings
Open up the pfSense virtual appliance in VMWare Worksation 7, but do NOT power it on. Bring up the Virtual Machine Settings by clicking “Edit virtual machine settings” or hitting “CTRL+D”.

Step 5: Configure pfSense from the console.
Now it’s time to boot your pfSense VM. When it boots, you should see a screen like this:

You can change the LAN IP by hitting 2, or use the default, it’s up to you.
Step 6: Configure pfSense from the web interface.
Open a web browser and go to http://192.168.1.1 (or whatever you changed the LAN IP to.). The default username is “admin” and the default password is “pfsense” (don’t forget to change these!). You’ll be greeted with a configuration wizard, click “Next”.

The time zone settings will come up, select your time zone and click “Next”.
Now you will asked to configure the WAN interface. If you have a static IP from your ISP, here is where you’ll configure it, UNLESS that is handled by your modem. If your modem gets the static IP assignment from your ISP, you will want to leave this as DHCP so it will pick up a private address from your modem.
The next page lets you change the LAN IP, if you did that in Step 5, or just want to use the default, you can just click “Next” and move on.
Finally we’ll set the WebGUI password. After you change it, you’ll have to log back on.
Next we need to configure the second WAN interface. Click “Interfaces” then “OPT1”.

Next we will create a Load Balancer Pool. Click on “Services” then “Load Balancer”. When the page loads, click the ![]() icon to create a new pool.
icon to create a new pool.

Add both WAN IP’s to the pool. I use the gateway for each WAN interface as the monitor IP.
Click “Save” when you are done.
Create a second pool for Failover, just set the type to “failover” for this one.

We’re almost done, the last thing we need to do, is setup some firewall rules. Click “Firewall” then “Rules”. When the page loads, select the “LAN” tab.


Now lets tell it to load balance everything else, you probably already had a “Default LAN -> Any” rule, just click the ![]() icon to edit it.
icon to edit it.

That’s it! All of your network traffic should now be flowing through the pfSense virtual machine. To verify that the load balancing is working, go to a site like www.whatismyip.com, and refresh the page a couple times. The IP shown should change back and forth between the external IPs of your WAN links every time the page loads.
If you want to test the speed out, you can use a site like www.speedtest.net, however these results can be a little inaccurate due to the “Speed Boost” that a lot of ISPs use these days. I have a 12Mbps down and 2Mbps up package from my ISP, and these are the results I get after setting up the load balancing:


If I pull the plug on one of my WAN links and run a speed test, this is the result:


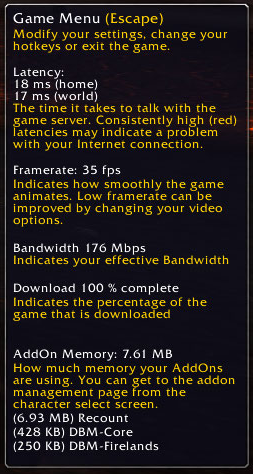
Just for fun I took a look at what World of Warcraft thought my “effective bandwidth” was…
I hope you’ve enjoyed this guide, stay tuned for Part 2 of my “Budget Laboratory” series, where I’ll show you how to setup a virtual SAN using freeNAS and VMWare Workstation 7.

Josh M. Bryant is currently a Director of Technical Product Management at Tanium where he builds products that help customers overcome the challenges of managing very large scale computing environments. Prior to joining Tanium, he was a Premier Field Engineer at Microsoft specializing in Microsoft Exchange Server, and then later a Cybersecurity Architect specializing in Compromise Recovery.